Showing posts with label trailer. Show all posts

Wednesday, March 23, 2011

Finally the Foundation

Hey everybody, sorry to be gone so long, but I promise to catch you up. This post will encompass the deck preparation. First I needed to bring the joists of the frame up to an even height. I needed something that I wouldn't have to worry about rotting so I chose Azak, a PVC material. I had to plane it down to thickness and notch it out to fit. I attached it to the metal frame with self tapping screws, making sure to seal them to the frame with caulk.


Then I fitted a plywood layer to the frame, leaving a slight gap at the sides to accommodate a bed liner finish to seal the edges.


I was again dealing with size issues and had to make it out of 4 pieces gleaned from 2 sheets of plywood. I fit them together with a tongue and groove that I milled into the wood, making sure to have the seams over a metal part of the trailer. This will help prevent water from getting to the seams.


I then laid out the floor joist. I tacked them in place temporarily so I could flip the whole thing over and secure the plywood permanently from below.


Katie then helped seal the plywood by first painting a coat of bed liner, then filling all the voids with paintable caulk, and then applying a second coat of bed liner making sure to seal the edges.


I then attached the floor system to the trailer with 4 carriage bolts in each trailer joist. We then hoisted the whole trailer up into a rack that I made to give access to the under side. The idea was to flip it all the way over, but the welded on light boxes were in the way, so it ended up propped and looking like a medieval trebuchet.


This gave us great access to really seal up the bottom of the trailer. We caulked any seam or void, sprayed bed liner in all the irregular places and rolled it on thick in the field. This was an incredible amount of work, but now I feel confident that the trailer will not rot out from underneath us. I fully intend for this thing to last 50 years.


We then ran all the rough wiring. This is the first time I have ever done this and it had me tearing my hair out. I am praying that it all works because all the wires are sealed up in there but good. Next was two layer of rigid foam insulation sealing between the layers with caulk. At this stage we realized that the opening of the doors was much higher than the floor. To prevent the circulation from being cut off in your legs when sitting in the doorway we decided to raise the floor 2 1/2 inches. Before you scream, "what about the weight!" it only adds about 25 pounds. I only raised the cabin area, not the galley, which affords a great surface to attach the galley bulkhead to.


We filled this layer with some pink fiberglass insulation we had left over from insulating the crawl space at our house.


I finished the deck with tongue and groove plywood lapping over the edge and sanding flush to make a perfect edge to attach the sides to. Now the foundation is complete. Stay tuned to see the walls raised and the roof put on.


TOMT_sig

Friday, February 4, 2011

OOOPS, Time to Back Up and Punt


We drug both sides outside when I finished finishing the second side, and crap if they didn't look totally different. Side one was a sickly yellow compared to the second, which was much closer to the color we were trying for.


We thrashed our hair and put on sack cloth, and finally decided to make side one again. So close to assembly, and now a major setback.


Now we are in superdrive to pump out another side. Thank God we had two more sheets of the oversized plywood. The deck and floor will have to be pieced together, but there are design benefits to be had by going in this direction. I will not have to creatively frame the floor to bridge the gap from the five foot wide plywood to the five and a half foot wide trailer.


To save time we will be building the floor at the same time we are finishing side one-number two. We started by stripping the trailer to its bare bones. I am going to be building a rack that will attach to the axle so we can flip the trailer over and back to prep both sides. We will also be using the bum side as a template to mock things up. Lots and lots to do.


Tuesday, January 18, 2011

Hustling buns now.


Now we are cooking with grease. The inside of all the parts are done and today I got the second of seven coats of varnish on the outside. The wave went on really well this time with just touchups around the edges. I still get a little heavy handed with the sander though, and got two thin spots on the white. I'll probably be the only one that ever notices.


I am doing a few things to speed up and improve the process on this side. I am finishing all three pieces at the same time, taping off the edges so there are virtually no drips, and vacuuming through the sander so there is much less dust and tack-ragging. All the varnish should be done by the weekend.


It has been so cold and wet here, but I got the garage hooked up with a little heater. A good hoodie and some tunes help too.


We are so excited to get to the assembly stage. I am going to start disassembling the trailer and shedding any thing not necessary. Dry fits, bed lining, electrical, spars, bulkheads, cabinetry, windows, skylights... woo hoo!!! It's about to get fun, and my new friend Todd has volunteered with some help. I am going to need it.


TOMT_sig

Tuesday, September 21, 2010

They Call it Finishing, but We Just Started

We have been really busy applying a coat of finish each day for over a week. I had to get in the paint post before we are off to a Tearjerkers event this weekend at Elk Neck State Park. Woo hoo! Lots of design ideas up close.


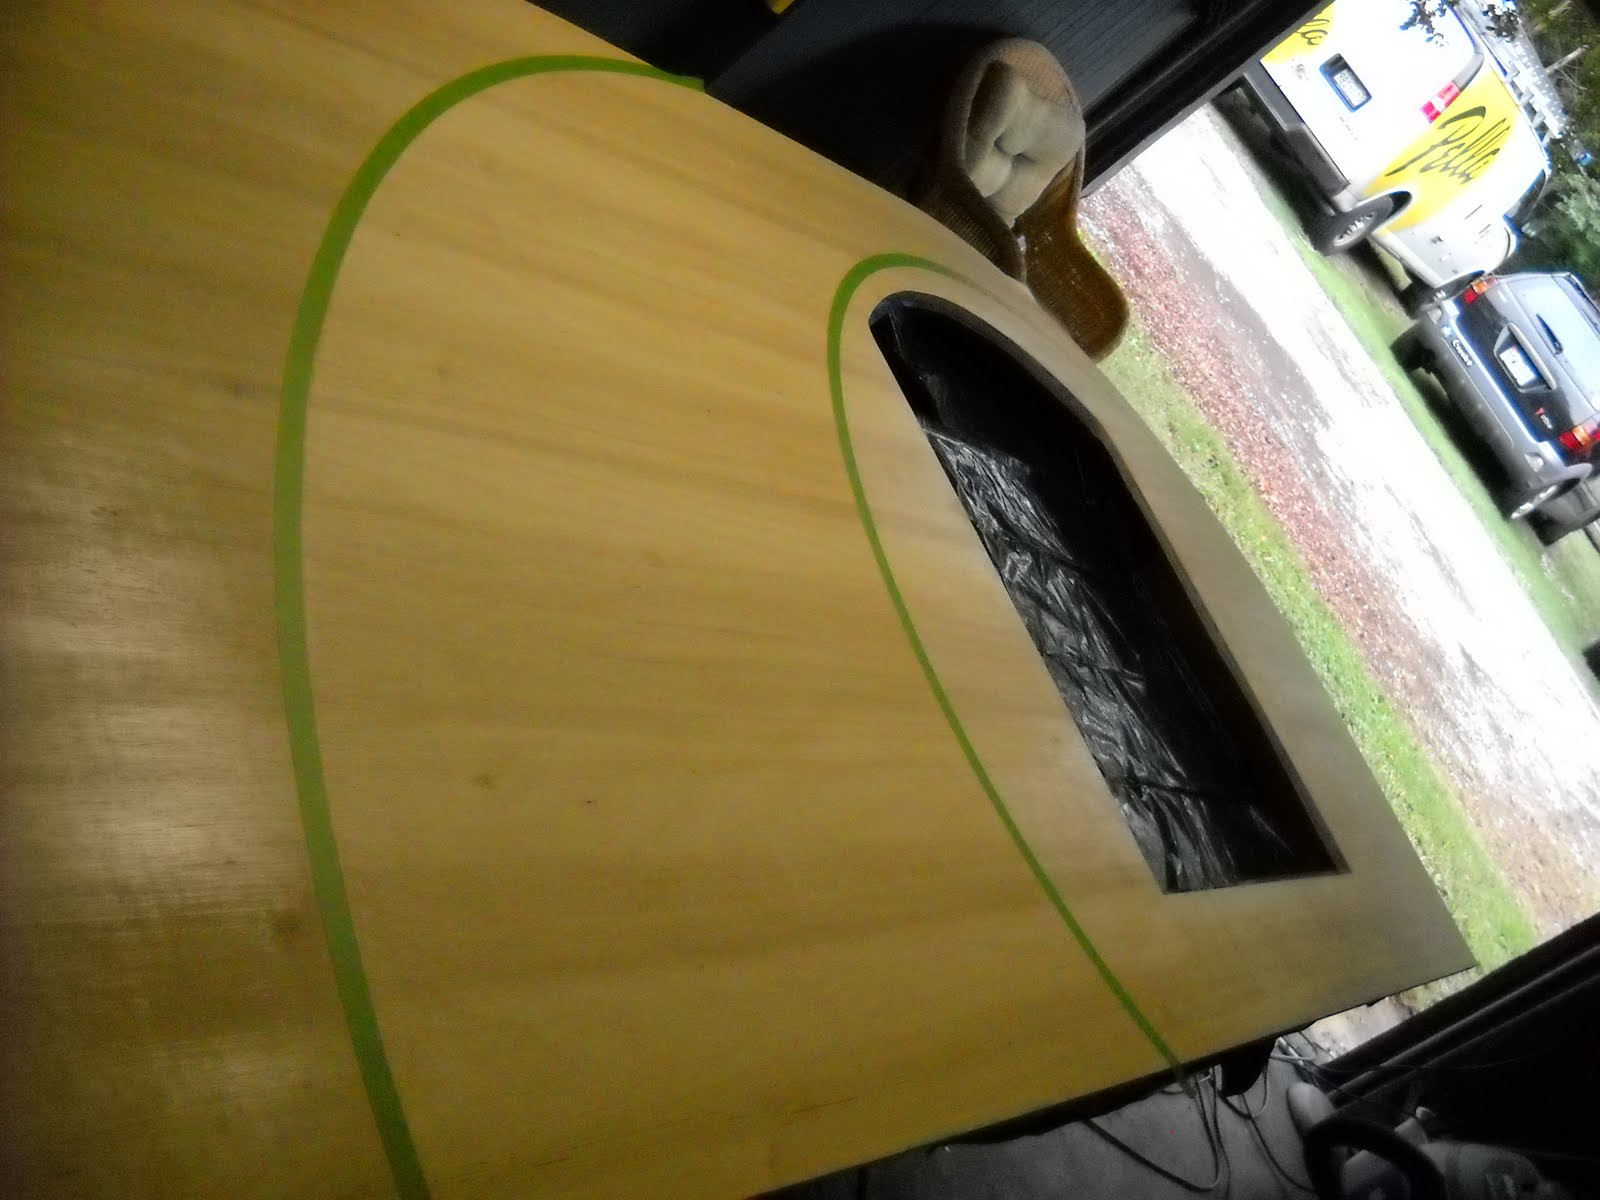
We were trying to achieve a pickled finish, but nobody really pickles anything anymore, they just use a white stain. We chose Cabot because they had the most vibrant colors available in a transparent finish. The problem we encountered was the stain would run underneath the taped edge.


To overcome the wicking I first used an exacto knife and scribed as deep a line as I could manage along the edge of the design. The first line we tried, we cut the line, taped over it, and then tried to run the knife in the same line to cut the tape. We realized pretty quick that this was not working and ended up with more than one line. You can still see the mistakes through the varnish, but luckily it didn't ruin the side.


First we taped off the wave and stained the field white, and then sealed it with sanding sealer.
Then we reversed the masking and stained the blue. Beautiful! The sanding sealer bled a little under the tape and I had to sand it out leaving some shallow gouges along the blue edges. On the other side we stain both colors first and then seal.


We were a little afraid that the white was going to be over powering, but it came out exactly as I had envisioned. So well that we decided to use the same white on the interior surfaces.


Next comes 7 coats of Spar Varnish, lightly sanding between each coat. After this we will set the side to the side and finish the door and the trim ring. Then we flip this side and finish the interior surface.


Can you say labor of love???

Thursday, September 9, 2010

Registration?

Jeremy is on his way to the MVA to register the utility trailer as we speak!

We decided to go ahead and register the trailer before we build the teardrop. Brand new, pre-assembled utility trailers don't have to be inspected so we avoid inspections all together because the trailer will already be registered and tagged before we build the teardrop... not to mention we'll be able to use the trailer for other things until we're ready to go into teardrop assembly mode. So there's less room for things to go wrong. That's always a good thing.

We also decided we want to get custom tags. What do you think of this?
made using Acme License Maker
I think it's fitting considering the trailer is going to have a surf-inspired theme. Why not have surf-inspired tags too? You don't get more than chest-high waves here in MD anyway. And a teardrop is only chest high itself. It's a pretty clever tag if I do say so myself :)
Wish Jeremy luck on registration!

TOMT_sig

Tuesday, August 24, 2010

The Race is On

Finally started! This weekend Katie helped assemble four sawhorses to hold the plywood. Yesterday I drew out the design on the top sheet, and today I made the first cuts.


These plywood sheets are really heavy so we sorted and stacked them in the order we are going to finish them. The top sheet will be for the trim on the starboard side of the tear drop. Because I'll only be using a two inch strip around the edge I used it to lay out the design and locate the door. All the pencil marks will not matter on this one. The blue tape is to help prevent fraying along the edge of the cut, which worked OK, but not as well as I had hoped.


I clamped the first two sheet together and cut them at the same time. After they were cut I used a belt sander to smooth the curves. By doing this, it ensures that the trim piece will fit perfectly to the side piece. The next step will be to take the measurements that will allow me to replicate the design and the door location. Then I will cut the inner profile of the trim.

Wednesday, August 11, 2010

Now it's On

Step number one is complete, threw down for the trailer today! Spent about twice as much money as I was planning, but as Confucius say, "good house needs good foundation." We looked at so many options, from Harbor Freight bolt togethers, to Carry-Ons, to custom welded frames, even used boat trailers.


The nice thing about this trailer is that the sides are designed to be removable, so the 5 x 10 frame is designed to stay stable with or without the sides. It is actually 5 1/2 feet wide, so that is going to call for some creative engineering. Maybe a roll off design so we can use the trailer without the teardrop? (Kate doesn't really like that idea.)


The next step is going to be finding the oversized 5x10 plywood. Anybody know where I can score some? We also looked at some cool flooring for the cabin today. Speckley industrial 12x12 floor tiles. We think they will look cool and stand up to anything. I cant wait to make some saw dust!